Copyright (C) 2006—2007 Gregory D. Weber
License for this documentation: GNU Free Documentation License, Version 1.2
License for OrganDesigner software: GNU Public License, Version 2
For OrganDesigner version 1.1.0.
OrganDesigner is a program to make GENPO easier to use. GENPO, a "virtual organ" for use with an organ SoundFont, requires a ".org" XML file to describe its organ. OrganDesigner is a graphical tool for generating the ".org" file from the SoundFont. It allows the user to select stops, assign them to divisions, rename them, copy them, etc.
Launch OrganDesigner from a terminal with this command:
$ organdesigner [inputfile]
The $ is the shell prompt. []'s indicate that the inputfile is optional. The inputfile can be either a SoundFont (".sf2") file or a GENPO (".org") organ file. If an inputfile is given, OrganDesigner will read it when started; otherwise, there is a file menu which you can use to select a SoundFont file.
Once you have started OrganDesigner running, use the File menu's Open command to open a SoundFont or GENPO file to begin creating a virtual organ.
 |
If the inputfile is a SoundFont file, OrganDesigner will read it to determine the names of the stops ("voices", "programs", "instruments") and their MIDI bank and program ("preset") numbers.
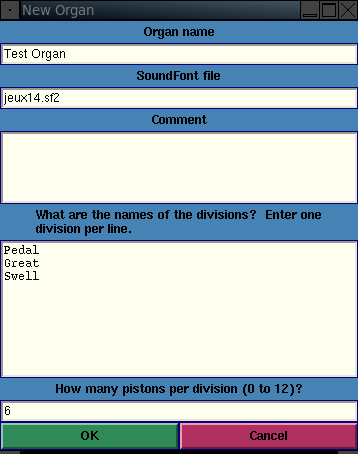
It will show you a New Organ dialog window where you can choose the name of the organ, comments, the names of the divisions, and the number of pistons (combinations, presets) per division. A division is usually associated with a keyboard, either manual or pedal. Enter each division name on a line by itself.
For GENPO compatibility, there should be no more than eight (8) divisions, and no more than twelve (12) combinations per division.
After making any desired changes, click on "OK" (or if you change your mind, "Cancel").
After completing this dialog for a SoundFont file, or immediately after reading a GENPO file, OrganDesigner shows the organ in its main window, with a listbox for each division. All of the stops read from a SoundFount file are initially shown in the first division, because OrganDesigner cannot decide where they belong: that is for you to decide. See Moving Things Around.
All the stops are initially listed under one division. What you probably want to do is move some stops to other divisions. You might also want to make copies of some of the stops and delete some of them. To do any of these things, you must first select the stops to be operated upon.
Mouse-1 means the left button, Mouse-2 is the middle button, and Mouse-3 is the right button.
A "range of stops" means a set of one or more stops that are contiguous, i.e., listed one after another without any intervening stops not in the set.
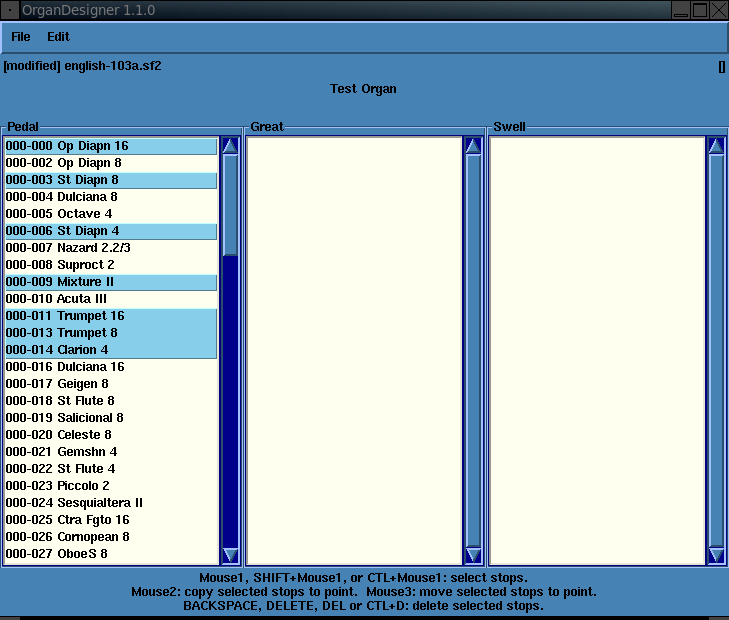 |
Point where you want the stops to go and click Mouse-3. The destination can be a division (empty or not) or a point within the stop list of a division. If you are pointing at a particular stop, the stops will be moved in immediately below that stop. To move stops to the beginning of a division, point at the name of the division, above the stoplist.
You can move stops within a division as well as between divisions.
If stops from more than one division are selected, all of the selected stops will be moved.
Any of the following keys or key combinations will delete the selected stops.
	        Control-d
		Backspace
		Delete
		Keypad Del
Caution: currently, OrganDesigner asks no questions and has no provision to undo the delete, or indeed any other changes.)
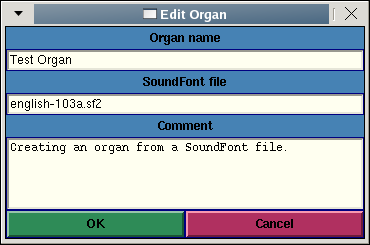 |
Choose "Organ" from the Edit menu to open up a window in which to revise the organ's name, path to the SoundFont file, and description.
Non-ASCII characters can be input using the Compose key, another X Input Method, or a character "palette" such as GNOME Character Map. Using the UTF-8 (Unicode) character set is recommended; for example, by setting the environment variable LANG to "en_US.UTF-8" (for English-speaking Americans; others replace "en" and "US" appropriately).
However, OrganDesigner is unable to use the SCIM input method, due to an unfortunate Tk-SCIM interaction. If OrganDesigner detects that SCIM is present, it will disable it and display "[SCIM disabled]" in the main window. Other applications can still use SCIM, even while OrganDesigner is running.
 |
Choose "Divisions" from the Edit menu to open up a window in which to add new divisions, modify divisions, delete divisions, and rearrange the order of divisions. While working in the Edit Divisions window, you are operating on a copy of the organ. The changes you make will be copied back to the main window when you click on the "OK" button, or discarded entirely if you click on "Cancel".
To add a new division: enter the division name and MIDI channel in the text input boxes, and click on the "Add" button. The new division will appear in the bottom of the listbox.
To change the name and MIDI channel of a division, select the division in the listbox. Its name and MIDI channel will appear in the text entry boxes where you can change them. Then click on "Modify."
To move a division up or down in the listbox, select the division and click on the "Up" or "Down" buttons. Up in the listbox corresponds to leftwards in the main window, and down in the listbox corresponds to rightwards in the main window. Moving a division above the top of the listbox will cause it to reappear at the bottom; similarly, moving a division below the bottom, it will roll around to the top.
To delete a division, select it in the listbox. Then (carefully) click on the "Delete" button. The division will be deleted immediately. This operation cannot be "undone" within the Edit Divisions window. But see immediately below regarding OK and Cancel.
To accept all the changes you have made since starting Edit Divisions, click on the OK button. To reject all the changes, click on the Cancel button. Either of these will close the Edit Divisions window.
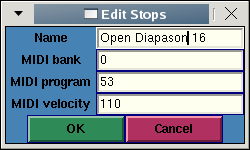 |
Select stops to be edited, then press control-E or choose "Stops" from the Edit menu. An "Edit Stops" dialog window will appear, which enables revision of the first selected stop's name and MIDI properties (MIDI bank, program, and velocity). Clicking on "OK" installs the changes for this stop and moves the next selected stop, if any, into the "Edit Stops" window. Clicking on "Cancel" throws away any changes made for the current stop, but not changes made to previous stops, and will close the Edit Stops dialog window immediately.
Choose "Couplers" from the Edit menu. An Edit Couplers window will open up.
 |
To create a new coupler, select the divisions to be coupled and the pitch (8', 16', or 4') using the option menus in the upper right of the Edit Couplers window, enter a name for the coupler, and then click on Add. To modify a coupler, select it in the listbox on the left; change its "from" division, "to" division, pitch, or name; and click on Modify. To delete a coupler, select it and click on Delete. To rearrange the order of couplers, select a coupler and click on the Up or Down button. (Note: GENPO organizes couplers by the divisions they are coupled to. For example, all couplers to the Great division will appear under the Great division's stops in GENPO.)
To accept all the changes you have made in the Edit Couplers window, click on the OK button. Clicking on Cancel will throw away all the changes. Either of these will close the Edit Couplers window.
Pistons, introduced in version 1.0.0 as "combinations", have been significantly revised in version 1.1.0. The methods for creating, editing, setting and recalling stops on a piston have changed; Toe Pistons are a new feature. Toe Pistons manage "general combinations" and can control all the stops of the organ. Non-toe pistons are associated with a single division and control only that division's stops.
 |
Pistons (combinations, "presets") allow turning on or off a number of stops all at once with a single button. To create or modify pistons in OrganDesigner, choose "Pistons" from the Edit menu. Select the division or "Toe Pistons" at the top of the listbox on the left side. Add, modify, delete, or move pistons using the same buttons as in the Edit Divisions dialog. Enter the name and MIDI preset number for each piston. For non-toe pistons, the piston's MIDI channel is the same as its division's and cannot be changed here. For toe pistons, the user also enters the MIDI channel for the piston. It is strongly suggested that all toe pistons share a single MIDI channel, which is distinct from the MIDI channels used by the divisions.
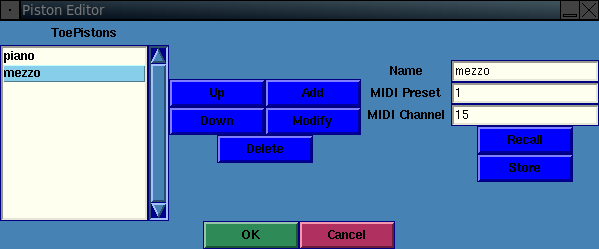 |
After creating a piston, select some stops in the main window, then click the Store button in the Piston Editor to set the stops for the piston. The Recall button selects the stops set with the Store button.
A Piston in GENPO appears as a button in the GENPO window, which can be turned on or off with the mouse. MIDI program change messages can also be used to activate the piston. The MIDI program change numbers correspond to the MIDI preset input in the Piston Editor.
The GENPO organ document type definition and software impose some restrictions on the numbers and types of pistons that can be used. Each division may have 0 to 12 pistons. Each of these should have at least one stop set to be turned on by the piston, according to the document type definition; however, GENPO will still run if some of the pistons have no stops set. GENPO pistons control only stops, not couplers. Toe pistons were introduced in GENPO version 0.9.5. Earlier versions had only pistons that controlled a single division.
Besides the editing actions described above, pistons are affected by loading a GENPO file, deleting divisions, and deleting or moving stops.
Use the file menu to save your work and quit.
The current version of OrganDesigner cannot do these things:
The plan is to remove these limitations in future releases.
(Known problem) Due to an unfortunate interaction between Tk and SCIM (an X input method), OrganDesigner is unable to use SCIM. Or rather, OrganDesigner can use it, but doing so will probably "lock up" the keyboard. To prevent this lockup, OrganDesigner disables SCIM, if it is present. SCIM is only disabled for the OrganDesigner application; other programs can still use SCIM, even while OrganDesigner is running.
(Known problem) In testing version 1.1.0, I was unable to input non-ASCII characters (e.g., accented and umlauted characters) using UIM, XIM, or any other input method. Not sure if this is a problem in OrganDesigner or my input methods are not set up correctly.
(Known bug) OrganDesigner does give an error or warning message when there are too many pistons for a division (more than 12), or too many toe pistons (more than 12). Running GENPO on the output organ file may then crash with a segmentation fault.
(Known bug) OrganDesigner does not delete stops from toe pistons, when the division that contains the stops is deleted.
(Known problem) Some error message dialog windows are too tall, and the OK button is off screen.
(Known bug) In the Piston Editor, clicking on "Recall" or "Store" when no piston is selected, or when the selected division or toe pistons pseudodivision has no pistons, results in Python IndexError exceptions.
(Known problem) Selecting a stop in one division leaves other stops selected in other divisions. If you then delete the selected stops, it deletes more than the one you just selected!
(Known problem) The layout of the Editor dialog windows (Division, Coupler, Piston Editors), while more uniform than in release 1.0, is now also more awkward to use.
Please report any usage problems or bugs to the email address shown on the author's contact information page, or to the Bug Tracker or the Help Forum of the OrganDesigner project.